AuthAnvil two-factor authentication
PERMISSIONS Security level with Admin permission to configure Resources/Users (HR). Refer to Admin security settings.
IMPORTANT AuthAnvil is only available for customers already using this 2FA option. If you are not already using AuthAnvil, these fields will not be displayed. Please refer to Configuring a 2FA app.
When AuthAnvil two-factor authentication is enabled, a resource must provide the standard Autotask log in, a four digit pin number, and a unique, token-generated, one time pass code. AuthAnvil provides a SoftToken option that allows resources to use their Windows Mobile, RIM Blackberry, or Apple iPhone device as an authentication token. Authentication token hardware is also available.
To begin using AuthAnvil two-factor authentication, complete the following steps.
You sign up for AuthAnvil two-factor authentication directly on the AuthAnvil Customer Portal. If you choose to sign up, your local organization will set up your preferred arrangements with AuthAnvil, specifying the number and types of authentication tokens you want to order.
Access the AuthAnvil Customer Portal at Scorpion Software Customer Portal.
or
NAVIGATION Left Navigation Menu > Admin > Admin Categories > Organization Settings & Users > Resources/Users (HR) > Resources/Users (HR) > Edit Resource > Security tab
If you have difficulty accessing the AuthAnvil customer portal, contact AuthAnvil at support@scorpionsoft.com.
NAVIGATION Left Navigation Menu > Admin > Admin Categories > Features & Settings > Application-Wide (Shared) Features > System Settings > Site Setup
Once you have set up the necessary arrangements with AuthAnvil, you must enable AuthAnvil two-factor authentication for individual resources in Autotask. To simplify that process, you can set up the Autotask AuthAnvil system settings to pre-populate the AuthAnvil Authentication Server URL and Site ID fields on the Resource Management Security tab.
The Authentication Server URL and Site ID are provided by AuthAnvil. This information will appear only when you enable AuthAnvil two-factor authentication for the resource.
To set up the AuthAnvil system settings, do the following:
- Navigate to Left Navigation Menu > Admin > Admin Categories > Features & Settings > Application-Wide (Shared) Features > System Settings.
- Expand the Site Setupgroup.
- In the AuthAnvil Authentication Server URL, enter the entire URL, for example: https://<domain.com>/AuthAnvil/SAS.asmx or https://<domain.com>/AuthAnvilSAS/SAS.asmx.
- For "AuthAnvil Site ID", enter the Site ID provided by AuthAnvil.
- Click Save.
NAVIGATION Left Navigation Menu > Admin > Admin Categories > Organization Settings & Users > Resources/Users (HR) > Resources/Users (HR) > Resources/Users
Once you set up your licenses with AuthAnvil, the resources that you sign up will receive an email from AuthAnvil that contains a personal pin code and further instructions for using AuthAnvil SoftTokens or token hardware. You must enable AuthAnvil two-factor authentication for individual resources before they can use it.
- Go to Left Navigation Menu > Admin > Admin Categories > Organization Settings & Users > Resources/Users (HR) > Resources/Users (HR) .
- Right-click the resource's name, and select Edit Resource.
- Click the Security tab.
- Select the Require Two-Factor Authentication for this Resource check box.
- Select an option for when the authentication requirement will take effect. Note that you can use this setting to temporarily suspend the two-factor authentication requirements at any time.
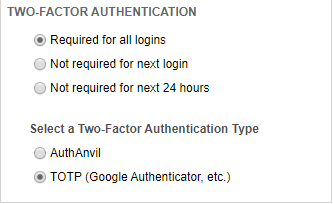
- Select AuthAnvil as your vendor.
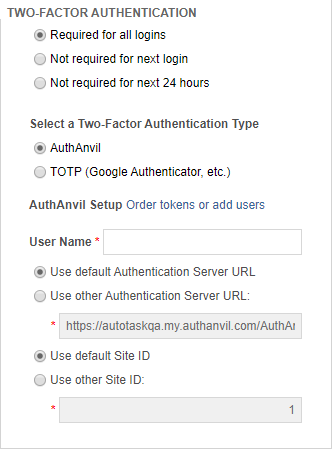
- In the User Name field, enter the user name provided by AuthAnvil.
- If the Autotask AuthAnvil system settings are enabled, the default authentication server URL and default authentication Site ID options are both selected. You do not need to enter the URL and Site ID and those fields cannot be edited.
- If the AuthAnvil system settings are not enabled or they are enabled but you would like to use a different URL, click to select the "Other Authentication Server URL and Site ID" options.
- In the "Use other Authentication Server URL" field, enter the entire URL, for example: https://<domain.com>/AuthAnvil/SAS.asmx or https://<domain.com>/AuthAnvilSAS/SAS.asmx.
- Click Save & Close to save the current selection and close the Resource Management page.
The following table describes the available options:
| Option | Description |
|---|---|
| Required for all logins | Selected by default. Authentication requirement takes effect immediately. |
| Not required for next login | Suspends the display of the two-factor authentication page for the resource's next log in to either Autotask or Autotask LiveMobile. The authentication code is not required for that log in but will be required again for all subsequent log ins. |
| Not required for 24 hours | Suspends the display of the two-factor authentication page for all logins for this resource, for both Autotask and Autotask LiveMobile, for 24 hours. When this option is selected, the date and time when the suspension expires display below the option. A Reset link allows you to extend the suspension for an additional 24 hours. The authentication code is not required until after the expiration date and time indicated but will be required again for all logins after that date and time. |
NOTE If you enter this information incorrectly, once the authentication requirement takes effect, the resource will not be able to log into Autotask. As best practice, we recommend setting up the AuthAnvil system settings to specify the default URL and Site ID.
When AuthAnvil two-factor authentication is enabled for a resource, a second login page displays after the standard Autotask login. The second login requires the user to enter their personal pin code and a pass code generated by their AuthAnvil token generator. Refer to Getting started with Autotask.
Authentication tokens are battery operated and should function for several years without requiring new batteries. When the batteries begin to weaken, the display will appear noticeably dimmer and the batteries must be replaced within a few weeks.
When replacing the batteries, avoid re-initializing the token by removing only one battery and replacing it with the new battery. Then, remove the second battery and replace it with the new battery.
If both batteries are removed at the same time, or the batteries are allowed to become totally depleted, you must contact AuthAnvil.


